How long should trekking poles be? How to choose trekking poles – selection by height and design. Features of use and criteria for choosing trekking poles
Many people think that trekking poles are not at all important when hiking, but this is not true. They are ready to help us in different situations: take part of the weight on themselves, become a support for an awning, turn into a frame for a stretcher, turn into a splint in case of a fracture. Therefore, you should not neglect this element of equipment and buy it for five and a half kopecks. If you hike more than once a year, quality trekking poles are worth considering, and I'll give you some tips on how to choose trekking poles - what to look for!
What to look for when choosing trekking poles
Design
The poles must be telescopic! In mountain tourism, you should always be able to change the length of the poles for convenience, efficiency and safety of the descents, ascents and plains. Moreover, on the plain you can also “play” with the length, changing the main goal from additional points of support to devices for accelerating movement =) .
The number of sections also matters for their compactness - the more, the shorter the poles when folded. Also, a larger number of sections gives a greater range of height adjustments, but this is not so critical. And of course, three-section poles when folded are more difficult to bend or break. This is important in a situation where they are not used for their intended purpose, for example, to create a stretcher or carry an injured person directly onto them.
In any case, you can’t go wild here - there is a choice of two sections and three, I haven’t seen any other options yet.
Fasteners
The second important point is the clamps! They absolutely should not be “twisters” (I mean collet clamps =)) or any other tricky devices! Exclusively clips! Preferably metal clips!
Metal clips
The problem with “twirls” and other dubious solutions is that no matter what brand produces them, they are still very afraid of dust, dirt and water. If all this gets into the mechanism, then the sticks begin to jam, do not fix well and, accordingly, lose their functionality. Often it is not possible to fix this on the go, you need to stop and apply force, sometimes even the force of a couple of people,
and sometimes tools to “fix” the problem.
The clips work on the principle of simple compression of the tube, therefore they are simple, reliable and easy to repair and configure!
Why do I recommend metal ones, because plastic can crack either when the poles fall on a stone, or in the cold, or when fastened with force! It is clear that metal also does not last forever, but it is significantly superior to plastic in reliability, especially if the plastic is cheap.
It is useful, but not critical, to pay attention to the adjustment bolts on the clips! It’s good if they are made in such a way that there is nothing to loosen, unscrew or get lost. For example, on my 2013 Black Diamond Expedition, the adjustment bolt is located under the clip latch and is not easy to loosen or lose.
 BD FlickLock clips and their adjustment bolt
 Section material
The third important point is the material of the pole sections. Here I recommend taking aluminum, not carbon. Carbon is certainly light and more elastic, but it doesn’t take a hit and doesn’t like abuse.
It is also better to look for the brand of aluminum in the description of the poles, to be precise - aluminum alloy! There might be something like 6005, 7005, 7075 and the like. Alloys differ in their composition, and therefore in their properties. Roughly and briefly speaking, the higher the number, the stronger the material (here those interested and knowing English can read about aluminum alloys - https://en.wikipedia.org/wiki/Aluminium_alloy). I personally recommend alloy 7075 - time-tested, but I think that there is already something stronger and more reliable in trekking poles.
Cheap poles are made from the softest alloys that can bend for no apparent reason 🙁. But it’s already unrealistic to straighten it normally 🙁 .
Tip
From this moment on, everything is not so critical. I'll just note a few points:
- The tip should be sharp with a special reinforced “tip”.
- It is good if the main part of the tip is made of metal. It will live longer if it frequently travels over small stones and volcanic slag.
- It’s great if the tip is removable and can be replaced without the use of special tools. Note that in any case the tip can be replaced, but you may need new special tips, tools and straight hands!

Pens
First of all, select the handles to suit your hand so that they are comfortable, but keep in mind the need for a small reserve for gloves or mittens. It’s good if there is an arm rest on top and a small protrusion on the bottom – they will come in handy! It’s good if the lanyard fits your hand comfortably and is wide enough so as not to cut into it.

Handle material:
- Cork is warm, comfortable, but unreliable and usually more expensive
- Rubber - cold, but reliable, cheap and versatile
It is desirable that there is another one below the main handle... or the handle itself is elongated, as if consisting of two parts. This is very convenient for ascents and traverses - you don’t have to constantly reconfigure the poles, you can simply switch them from one handle to another.
I note that even if there is no second handle, you can always wrap reinforced tape, blue electrical tape, or who knows what else, making something like a second handle!

Rings
The rings are worth checking for their flexibility! They should be moderately flexible and elastic. If the rings on your trekking poles are plastic, throw them away and buy others separately. The plastic ones crumble on the first stones.
It makes sense to take winter wide or very wide rings if you are sure that you will walk on extremely loose or plump snow; if the snow is only in the form of snowballs that remained in the mountains after winter, then small rings will work with a bang. Plus, they will be less likely to get stuck in rocks or bushes!

I can personally recommend trekking poles from the famous brand Black Diamond that have been tested by me and time. In particular, models: Expedition and Trail Pro, and for those who walk in the mountains, snow and glaciers in winter (you can read the review at this link -).
Flawstrekking poles
- excess weight;
- deterioration in coordination of movements due to habituation, which is felt in difficult areas where they cannot be used;
- if you have weak arm muscles, they may become sore from unusual stress;
- are ineffective as a means of self-arrest on snowy slopes in the event of a fall.
How to care for trekking poles?
After using in wet conditions, trekking poles should be dried and preferably lubricated. Although trekking poles do not rust, aluminum can oxidize, which can shorten the life of the poles.
How to choose trekking poles?
When choosing poles, pay attention to the length - they should suit your height. If you are significantly taller than average, make sure the poles are not too short. The handle should be comfortable for your hand, try adjusting the hinges. The poles should not be too heavy, but if your weight is more than 90 kg, then ultra-light ones will not be suitable, because... they may break under load. Carbide tips are preferable to steel or plastic tips. Check the operation of the locking mechanisms. A metal ring will be more durable than a plastic one.
For winter hikes, appropriately enlarged attachment rings should be available.
You should not take too cheap poles - most likely their quality leaves much to be desired. The most recognized pole manufacturers are Leki, Black Diamond, Komperdell, Masters. The cost of fairly reliable telescopic poles for not very difficult hikes is in the range of 60-80 dollars. High-quality trekking poles will last a long time, and you will not regret the money spent.
Summary
Increasingly, in the mountains of the Carpathians, Crimea, and Caucasus you can meet tourists with “telescopes,” and in the Alps it will probably be even more difficult to see someone without them. This means that more and more people are beginning to recognize the benefits and convenience of trekking poles. Many novice tourists, returning from a hike, having felt their benefits, advise everyone to take poles with them.
When hiking in the mountains, it is quite possible to use ordinary ski poles, but they are not convenient to transport and the length cannot be adjusted. The easiest and free option is to find a wooden staff in the forest, but this is not so convenient and not reliable.
Write a comment
- Required fields are marked * .
Igor Belov
Posts: 2
Reply #2 on: Mon March 16, 2015, 11:08:45
The use of all kinds of sticks and staves began from the birth of tourism as a sport. Poles allow you to relieve the shoulder girdle on horizontal sections of the path, and on steep sections they serve as an additional point of support. (Those who have ever walked under backpacks without poles probably remember the feeling when there is simply nowhere to put your hands - as a rule, everyone grabs the backpack straps.)
In the article we tell you the basics about trekking poles: design features and materials, selection of length and the basics of moving with telescopic poles.
Since the beginning of the mass industrial use of aluminum, tourists have quickly mastered ski poles as an auxiliary tool. In Europe, since the late 1950s, they have become firmly established in tourist life. Perhaps the story would have stopped there, but ski poles had one significant drawback - a fixed length. Using poles of a fixed length on difficult terrain is inconvenient, and transporting them is even more difficult.
Mountain tourists at the beginning of the twentieth century on Mont Blanc. Source: alp.org.ua.
However, without them it was even worse. We had to make compromises - we used ski poles. In our country, starting in the 1980s, a lot of homemade designs of telescopic poles appeared, when the upper half and handle were used from a ski pole, and the lower link was used from a cross-country ski pole. This design made it possible to stack the segments on top of each other. They were connected with screws.
In 1974, the German company Leki released the first mass-produced telescopic poles. The Makalu model is practically no different from modern models: the design of three segments is still considered the standard.

Trekking pole design
Moving on to the design features. A trekking pole consists of segments of different diameters, a mechanism for connecting these segments, a handle and a tip.
Poles with clutch
The mechanism that allows you to adjust the length of the stick is perhaps the most important element of the entire structure. The classic collet (coupled) design appeared on the first trekking poles and is still used today. The rotating mechanism with the help of a wedging element allows you to fix the segments in the desired position.

In budget models, the structure is made entirely of plastic, but models with aluminum bushings are more often used. The design is quite simple and has been tested many times over decades of production. All the actuators are located inside the stick, so they are quite difficult to damage even if you accidentally step on it. Models made of plastic suffer from thread wear - it collapses and the poles no longer lock in place. It is impossible to restore the thread.
In general, models with a coupling pattern are recommended for hiking on simple terrain with light loads. Often, due to water ingress, the stick begins to spin and stops fixing. If the water manages to freeze, the stick may jam, in which case the mechanism will have to be warmed up and ventilated. It’s worse if the mechanism jams due to dirt accumulated inside. In this case, the stick must be carefully disassembled, being careful not to damage the coupling. However, this can easily be avoided by regularly cleaning the mechanism.
Lever Clamp Poles
In the early 1990s, Black Diamond introduced lever-clip poles. The original and at the same time simple design allows you to quickly adjust the length of the poles even with thick mittens. Initially, clamps made of frost-resistant plastic were used, now metal clamps are used in expensive models. The actuation force in such clamps is easily adjusted. In general, this design is considered the most reliable and suitable for hiking on difficult terrain.

Now almost all manufacturers have models with a lever locking mechanism in their assortment. Some of them use both schemes simultaneously in their models - both the clutch and the lever - which greatly increases the reliability of the stick.
From time to time, poles with original segment fixation systems appear on the market. All kinds of internal clamps and stops have not yet taken root in trekking poles and have not had a significant impact on the development of the industry as a whole. They are quite labor-intensive to manufacture and often have increased weight and cannot be repaired in field conditions.
Lever
Various materials are also used for the handle. In budget models, this is usually plastic or rubber, which are generally suitable for simple hikes. The problem is that the plastic handles quickly cool down and begin to chill the hand, and the hand begins to slide along the wet plastic handle. In addition to the above, rubber handles are also quite heavy. Therefore, sticks with cork handles or foam handles are mostly found in everyday use.
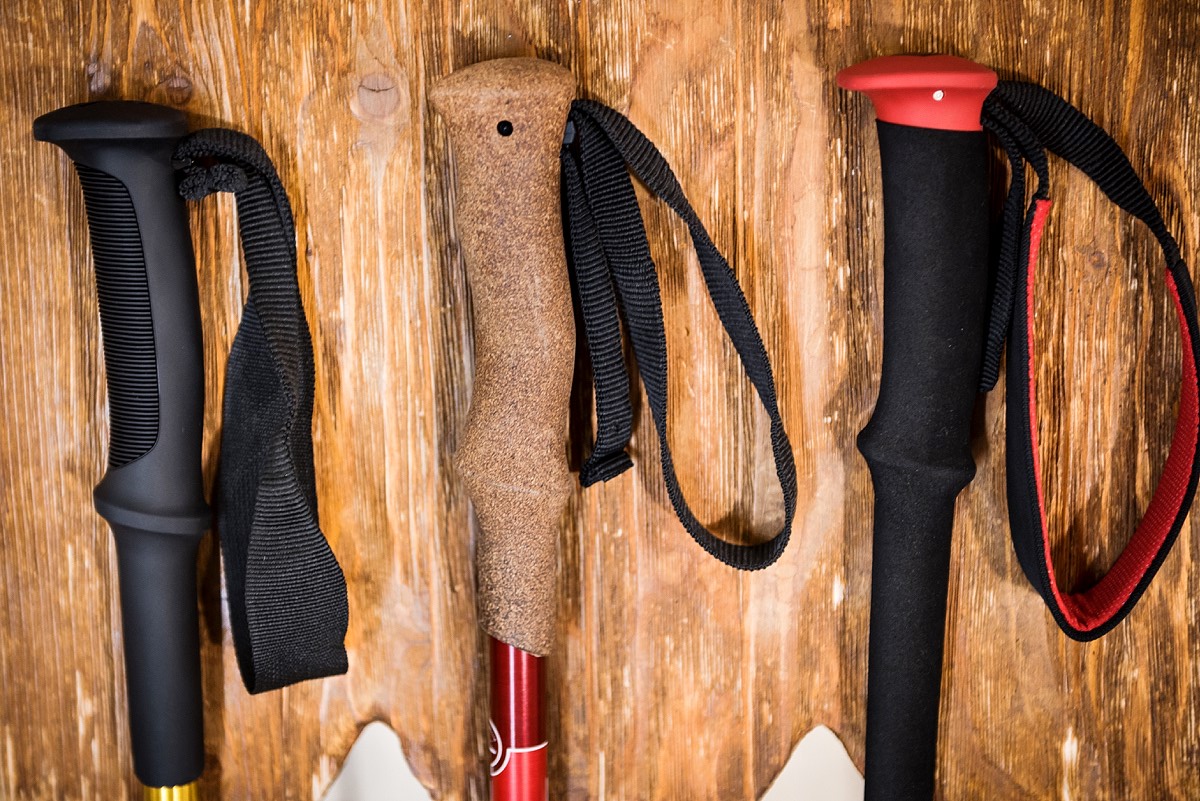
Handles made of various materials: plastic, cork and foam.
The cork handle is quite light and does not freeze, but a wet hand will slide over it. In this regard, a foam handle is most convenient: soft, light, it does not freeze and allows you to work comfortably with a stick. As a rule, such handles are produced elongated, with an additional interception - this is very convenient on short, steep takeoffs, because no need to constantly change the length of the stick ( see photos below: on descents - lengthen, on ascents - shorten).


In some models, a special spring is mounted in the handle, which reduces shock loads on the hand during movement - this system is called anti-shock. The thing is quite contradictory, because... How noticeable and significant the comfort from using the anti-shock is is a matter of debate, but the weight of the stick itself increases. Antishock is not widely used in tourism models.
Tips
The tips for trekking poles are made of hardened steel, and their service life is quite long. Rings are attached to the plastic body of the tip: small for mixed areas or wide for snow. Small rings should not be neglected: they are necessary so that the stick does not fall between the stones and does not get stuck.

Trekking pole materials
The most common material in the production of trekking poles is still aluminum and alloys based on it. Inexpensive, lightweight and durable - it is great for sports purposes. Poles made of carbon are quite common, and less often - combined designs, when some of the segments are made of carbon and some of aluminum.
First of all, the material affects the weight of the finished product. On average, a pair of telescopic poles made of aluminum weighs about 500 g, carbon - about 400 g.
Carbon has one significant advantage: despite its high strength, this material is very light. If weight is a critical factor for you, you should choose from carbon models. But there are some nuances here too. It’s a common story when, on a descent, your pole gets stuck between rocks, and you, without having time to remove it, by inertia, load it heavily. In such a situation, an aluminum pole will bend in the worst case, but a carbon pole may burst. It is important to remember here that while the aluminum segment can still be somehow straightened and a route can be taken with it, carbon fiber breaks.
There is a second important point. Carbon is an expensive material to produce and difficult to process. Hence, in fact, the high cost of the finished product. There is no ready answer for whom and under what conditions a particular material is suitable. If you go to the mountains a lot, and are willing to pay more to save 100 g, carbon is your material. If not, then you can find a lot of interesting options among aluminum poles.

Review of popular models
Aluminum poles with a lever clamp and a combined cork and foam handle. Light weight - 480 g, length - 140 cm. They are perfect for hiking and mountain trips. In terms of price/quality ratio, one of the best options in our range.
Although this model is heavy (616 g of steam), it is made of tubes of increased diameter, which are fixed with double clamps: collet and lever. If you carry a heavy backpack or just want durable poles for all occasions, you should pay attention to this model.
Komperdell Hihglender Cork Antishock trekking poles
Poles made of aluminum alloy, 140 cm long. Equipped with an anti-shock system. A relatively light and compact option: weight - 542 g, folded length - 71 g.
Trekking poles Black Diamond Trail Back 3
In the world of trekking poles (and in the world of mountaineering in general), Black Diamond has long been a household name. Likewise, the Trail Back model has long earned the love of tourists and climbers. Reliable, compact poles are one of the best options in the mid-price category.
Komperdell C3 Carbon Powerlock Trekking Poles
Expedition model made of carbon with power locks that prevent spontaneous folding - reliable and light (428 g) poles.
Black Diamond Trail Pro Trekking Poles
The model can be called the editor's choice. These lightweight (520 g) aluminum poles have long been a well-deserved favorite of climbers - an excellent option for difficult hikes and climbs. Metal link clamps eliminate any problems with adjustment on the route.
Trekking poles are very useful as support equipment. In addition to their main use, they are used to make stretchers, set up tents and awnings, test the soil, measure the depth of rivers or swamps that need to be crossed :) In conclusion, a few basic recommendations for their use.
How to adjust pole length
To adjust the length, take the unfolded stick by the handle, your elbow should be bent at an angle of approximately 90 degrees. This is your basic pole length for walking on horizontal surfaces. During the ascent, the poles are shortened, and on the descent they are spread apart.
When purchasing in an online store, you should focus on the maximum length of the poles. 140 cm is the basic option for heights of 175 and above. For shorter people, poles with a length of 130-135 cm are suitable.
When moving on a horizontal surface, you must follow the rule of uniform support: you take a step with your right foot and lean on the left stick, your left foot on the right stick, and so on. This way, you will always have uniform four-point support. On a climb, especially a steep one, shorten the poles and when moving up, do not carry them far, this will allow you to fully use the strength of your arms. On the descent, spread the poles, first confidently rest the poles further down the slope, load them, and then go down gradually.
Since the lower segment of the sticks tapers towards the tip, in order to avoid spontaneous folding, it is better to adjust the length using the second segment.
The lanyard should be adjusted so that it does not pinch your hand and you can freely work with poles.


All that remains is to wish you to find your match. And see you in the mountains!
First of all, it is necessary to clarify what is meant by the term “tracking”. In short - hiking. The term itself comes from the English word “trekking”, which literally means “hike”. So trekking poles will be useful for those who are interested in hiking.
What for?
This question will inevitably arise in the reader's mind. And it will be quite reasonable. Tourists have been walking for years without any walking sticks. Is it really impossible to do without them?
It's possible to get by. However, poles provide several important advantages, the main one of which is reducing the load on the long-suffering human spine. As you know, a tourist carries a backpack on his back. A heavy backpack does not at all contribute to evenly distributing the load on the spine. Sticks also help reduce the stress on your knees. This is especially true if there is a long climb ahead of the tourist.

In addition, poles help maintain balance. Trekking involves traveling over rough terrain. And in such terrain, no one can guarantee that a tourist will not fall into some hole that he did not notice. Using a stick, you can check the place where you are supposed to put your foot next. And this simple action will help you avoid many troubles.
All these things make a trekking pole a necessary and useful tool. But these sticks are different. And in order for the poles to serve the tourist faithfully for a long time, when choosing them you need to pay attention to some things.

The first thing to consider when choosing a set of poles is weight. You need to take your own weight and add to it the maximum weight of cargo that you can carry in your backpack. If the total weight exceeds 100 kg, it is better to refuse light trekking poles and pay attention to heavy models. Also, when choosing poles, it is necessary to take into account the height of the traveler. If your height exceeds 180 cm, you should choose poles whose length is 130 cm. Even if the choice turns out to be wrong, the poles can be adjusted in height. So they can be configured at any time to suit your needs. If you stand on a flat surface and place a stick next to it, then the handle of a stick that is correctly selected for the height should be 7 cm below the armpit.
Poles usually have a telescopic design and consist of several sections. This allows them to be folded. But the handles of the sticks can be different. They are made from both rubber and polymer materials. If the handle is rubber, then it will be heavier than the polymer one. In addition, rubber handles have another drawback: they make your hands sweat quickly. So when choosing poles with rubber handles, it makes sense to think about purchasing hiking gloves.
As for polymer handles, they are more comfortable than rubber ones. Firstly, they are lighter. And secondly, they contain balsa wood shavings, which makes them porous, preventing your hands from sweating during long walking.
.jpg)
You should also take a close look at the locking mechanism of trekking poles. The stick sections are connected in different ways. They can simply screw into one another. Or they can be connected using a special lock, which is equipped with a small lever. This design makes it possible to change the length of the poles at any time. All you need to do to do this is move the lever and press on the stick. If you decide to choose this particular type of stick, you should pay attention to the rod inside the locking device. This rod must be steel. There are poles with a plastic shaft, but it is better to refrain from buying them, since they do not last long.
Another integral part of the stick is the tip. The best tips are made from pobedite alloy. Lower quality tips are made from regular steel. If the tip is made of pobedite alloy, then it looks like a small pin. Moreover, its color will be dark. Steel tips are much larger in size and have a characteristic matte shine. A stick with a pobedit tip is much more durable. However, it will also cost more.

The number of sections in a stick also varies. The stick may consist of two, three or four sections. The general rule is simple: the shorter the stick when folded, the better.
And finally, shock absorbers. They can also be part of the sticks. Whether they are needed or not depends on where exactly the trekking poles are intended to be used. If the terrain is not too rough, the presence of shock absorbers will have a beneficial effect on the condition of the wrist joints, as it will protect them from sudden shocks.
If you plan to use the poles on difficult terrain or in the mountains, it is better to avoid shock absorbers. In the mountains, springy poles can do a tourist a disservice. And instead of protecting your joints, they can cause serious injuries.
What types of sticks are there?
You can separate poles for Nordic walking and for trail running (skyrunning), but this division will be quite arbitrary, since often the only difference between them will be in weight. Some trail runners (especially skyrunners in the Vertical Kilometer ® discipline), for example, use non-folding ski poles in races.
- Nordic walking poles are usually the simplest, cheapest and heaviest.
- Poles for trail running (skyrunning) are lighter and therefore more expensive.
It's quite simple: the lighter the stick, the more expensive it is. Aluminum poles generally weigh 250-350 grams per pole, while the best carbon models offer weights between 150-200 grams. That, in general, is the whole difference. But when it comes to a long, multi-hour race, then every hundred grams of excess weight matters a lot.
There are sticks folding And not folding. Non-folding poles are mainly used for Nordic walking.
Folding ones are divided into two types:
- telescopic, in which structural elements, when folded, are hidden one into another according to the principle of a system of retractable tubes entering one another (pictured above);
- folding, in which the structural elements are folded like a folding meter (pictured below).

The mechanisms for fixing the elements of the stick also differ.
For telescopic poles, this is either a screw-on fixation mechanism or a clip-on clamp. Both mechanisms work very reliably and the choice depends only on personal preferences.
For folding poles, the folding and unfolding mechanism is based on the use of a flexible cable running inside the pole. The mechanism is simple, reliable, allowing you to fold and unfold the stick within literally seconds.
Poles are made primarily from either aluminum or, more expensive models, carbon, or a combination of these two materials. The material of the handles can be completely different (plastic, rubber, rubber, etc.), as well as their shape and length, even using natural materials, for example, balsa wood, so that the hand does not sweat and does not slip.
All poles are equipped with straps (lanyard), which allow you to more securely fix the pole in your hand. Most often, the lanyards are removable. We would strongly not recommended use a stick without a lanyard or without fixing the lanyard on the hand. The fact is that the tips of the sticks are often made of hard alloys (pictured below), they are very sharp and are practically weapons. With such a tip you can easily, like a spear, pierce anything (even yourself when falling on a stick). That is why, with such stick tips, you can do not allow them to be carried into the cabin as hand luggage.

ALWAYS USE YOUR BELTS FOR YOUR OWN SAFETY!
A stick with a strap on your hand will never roll down the slope and will not be left far behind if it suddenly gets stuck in a crevice during the descent. You will never lose it if you wear a belt on your hand.
Some lanyards have an ergonomic shape and are tightened on the wrist using a Velcro fastener, which operates on the principle of a burdock. This is quite convenient, as the hand and forearm relax, and it saves energy. But over long distances you often have to unfasten and fasten this “Velcro” and this takes a lot of effort, and most importantly, the “Velcro” constantly strives to stick where it is not needed. This becomes terribly annoying after 10-12 hours of movement. Therefore, many manufacturers began to use various designs for quickly attaching belts. They are a half-glove, constantly worn on the hand, and a quickly removable carabiner, such as, for example, sticks from a German company Leki(photo below). This glove also protects the palm when falling or leaning on stones.

The main large manufacturers of trekking poles are: Black Diamond, Leki, Dynafit, Raidlight, and there are also Guidetti, CAMP, Swix, Salewa, Cober, etc. There are a huge number of manufacturers.
How to choose poles according to height?
If we are talking about telescopic poles, then everything is simple - the height of the pole is adjustable, and with practice you will experimentally choose a working height that is convenient for you. If we are talking about folding poles, then most often these models are not adjustable in height, although Leki has now released adjustable folding poles, in which the adjustable section is hidden in the handle.
Manufacturers sell folding poles in increments of 5 centimeters. But in any case, a table on the seller’s or manufacturer’s website will come to your aid, helping you choose the height of the poles depending on your height.

If we are talking about buying the first poles in your sports life, then we would recommend buying telescopic poles in order to empirically select the length that is convenient for you during use. For example, for the author of this article, with a height of 180, the manufacturer recommends poles with a height of 125 centimeters, but for me a working height of 130 centimeters is more convenient. I ran with different poles of different heights and came to the conclusion that it is at a height of 130 centimeters that I most comfortably walk uphill and use energy optimally.
As for changing the length of the poles while moving along the distance, depending on the ascent or descent and their angles, experience shows that it is better not to change the length of the poles. From our point of view, there is no point in this, just an extra waste of energy at a distance. The angles of mountain slopes are not constant, so why change the length of the poles every time this angle changes? Also, in our opinion, you should not try to change the length of the right-left pole when traversing a slope. All this is unnecessary and unnecessary waste of time and effort.

Transporting poles.
On long races it is impossible to carry poles in your hands all the time, and on some trails of increased mountain difficulty you often have to walk using climbing rails, which is simply life-threatening if your hands are full. It’s best to attach them to your backpack in places where you don’t need poles or get in the way. For example, Salomon backpacks have standard and convenient mounts for both telescopic (photo above) and folding poles (photo below).

Or you can use multifunctional belts, for example, like the ARCH MAX Trail Pro, to attach folding poles. The video below shows the mounting process.
Another feature of folding poles, at least some models and manufacturers, is the vibration of such poles when moving. They are more mobile when leaning on them due to less reliable fixation of the segments than telescopic poles. Expensive and modern models use the Antishock system, which avoids such an unpleasant phenomenon, but all this undoubtedly increases the cost of the poles.
Where to use sticks?
Of course, poles are mainly used on mountain trails with a lot of elevation gain. But sometimes poles are very useful on “smooth” trails with little climbing, but for example a lot of dirt. Using poles helps relieve stress on your legs and, most importantly, your back, saves strength and helps with balancing on unstable surfaces. You have to pay for this by increasing your pulse rate due to increased load on your arms and excess weight. Whether you use sticks or not is your personal choice..
Advantages and disadvantages of using trekking poles.
ADVANTAGES:
The use of poles allows you to give the body a more even position and thereby, due to the opening of the chest, improve breathing, since the muscles of the diaphragm will work more smoothly. Also, using sticks improves blood circulation in the limbs. The return of venous blood relieves swelling of the hands and fingers and promotes better thermoregulation.
When walking on inclines, poles act as shock absorbers and ease the stress on your ankles, knees, hips and spine... This reduces the risk of injury in the short and long term. When climbing climbs, using poles reduces the load on the quadriceps and hamstrings, since we transfer part of the body weight to the poles, leaning on them. This will keep your feet fresher if you use poles.
But it should be noted that using poles increases your heart rate (by an average of 10%) and increases calorie consumption. This is good if your goal is to burn more calories and lose weight, but bad if you are running in competition. On the other hand, the slight increase in heart rate and energy expenditure is offset by a decrease in overall fatigue and a reduced risk of injury.
On long trails, as opposed to short ones, it is more important to maintain “freshness” for as long as possible than to regulate your heart rate, and therefore the use of poles is justified. Poles also help you balance, which means you feel more confident. Sticks help overcome obstacles such as mud, snow, unstable and large stones, etc.; ford streams and rivers, and in extreme cases, protect yourself from an animal or help another runner.
FLAWS:
First of all, these are additional financial expenses. The next item is the extra weight that you need to carry with you. Although modern carbon poles weigh no more than 500 grams per pair, during competitions every extra gram counts. Sticks also occupy your hands, making it difficult to take water and food.
You also need to understand that using poles requires mastering, although quite simple, the technique of running with them. In the video above, Russian Skyrunning Champions show movement techniques using trekking poles, and here is a short accompanying comment from Dmitry:
"The eternal question is whether to run with poles or not? Before you ask yourself such a question, you need to buy good light poles and learn how to run with them. The longer the distance and the greater the climb, the more poles will help you. At the beginning of the race, poles will help you keep your legs fresher , and in the second half I will really help your tired legs. If you have problems with coordination, are overweight, or even just have large muscles, for example, like me, I recommend training with poles and running mountain races with poles too.
Try to use different walking and running techniques with poles, alternate. If you train in places where there are no mountains, walk with poles on a treadmill at maximum incline, up stairs, or just do exercises using poles. Until last year I didn’t use poles, now I run all races with them, last year I tried carbon Black Diamond ones, the poles lasted me for 3 races, they broke quickly. After that, I started running with Camp Xenon 4 poles, I’ve had them safe and sound for a whole year now.”
If you've never used poles before, it's best to practice running with them at least a few times (mounting them on a backpack, feeding with them, getting up and down techniques) before taking them to the competition. Effective training exercises using trekking poles can be seen in the running school video Trail Running School Dmitry and Ekaterina Mityaev. Another set of exercises with trekking poles can be seen at LINK.
Besides, you need to carefully read the race regulations . In some races (for example, the famous one) the use of sticks forbidden, and in those where it is allowed, in the vast majority of cases, it is necessary to go with them the entire distance from start to finish. You cannot use them only on the climb, and then leave them and continue on without them. You also need to be more attentive towards other runners and not injure the person running next to you with a stick.
It can be stated that there is no specific trend in the use of poles among professional or amateur runners. Professional athletes, just like amateurs, some use poles all the time, some from time to time, and some never. You can understand whether you need poles or not, whether they help you or hinder you, only by experience by running a sufficient number of races with them and without them.